Zultys - ZAC (desktop software)

Download
ZAC (Zultys Advance Communicator) can be downloaded from the following link: Download Link
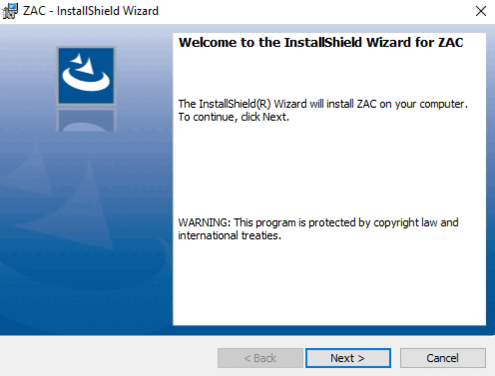
Once the application has been downloaded, please launch and follow the on screen instructions.
Installation
Before going through with the installation. It is recommended to set all LOCAL CONTACTS as buddies in the system!
Windows
- Launch the downloaded executable.
- Follow on screen steps.
- Once complete, open the newly installed application.
MacOS
- Launch the downloaded executable.
- Follow on screen steps.
- Once complete, open the newly installed application.
Logging In
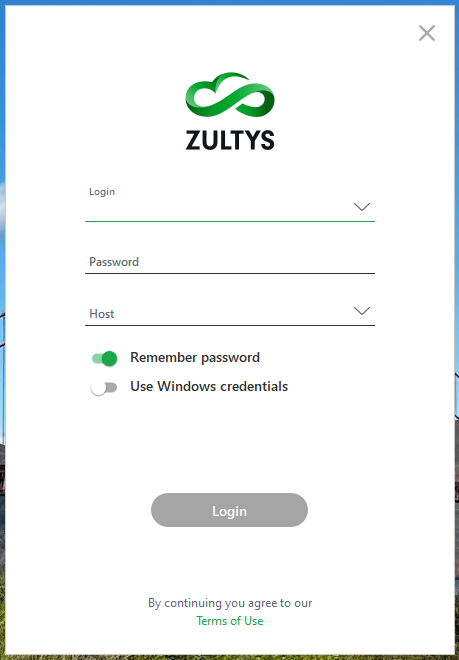
Once you launch the application, you will be prompted by a login screen.
- Enter your username in the login box. (usually your extension)
- Enter your password.
- Enter the system hostname / server address .
(eg. CUSTOMER.cloud.topsoffice.ca)
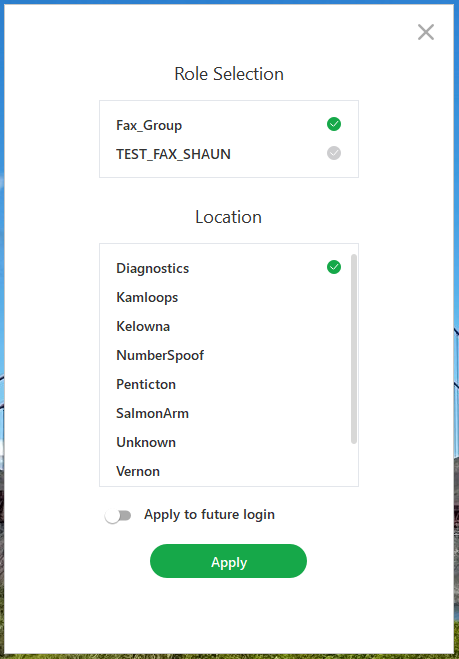
Role Selection
Depending on the kind of your account, you may be prompted to select your role & location.
- Roles are typically call groups or departments that you are set to be able to access
- Locations are primarily used for 911 calls, and caller ID.
- If your business has multiple locations, select your current location. If you place a call to 911, the address of the location selected here will be visible to the 911 operator.
- Enable Apply to future login to save this information.
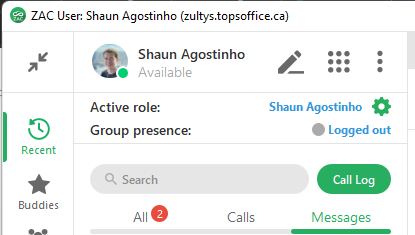
User Interface Overview
Please see the following for an over view of the user interface.
- Switch between full screen and compact mode (shown)
- Add personal info and picture
- Set Presence and personalized message visible to other users
- Call by Number
- Settings / Log out / Exit
- Change role for Outbound calls
- Change Role
- Change Group Presence
- Binding Area
- Change Location
- Sub-Menus (voicemail is currently shown)

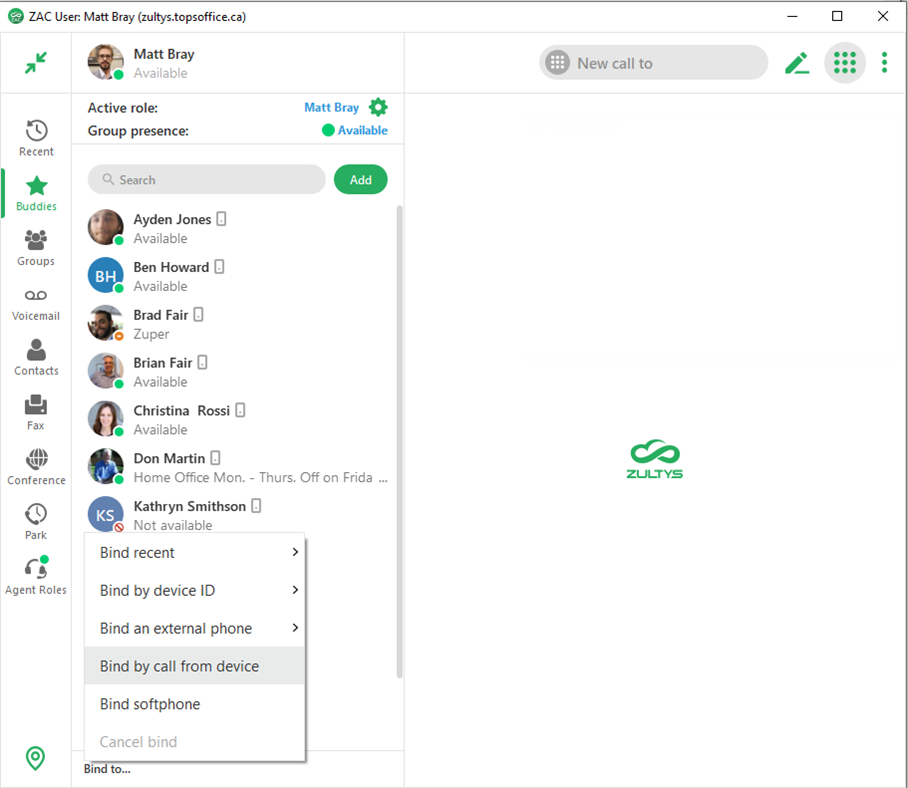
Binding
The first time you sign into ZAC on a new device you may have to associate the software to a phone. This process is called “Binding”. The binding area is found at the bottom left:
Desk Phone
- Select Bind to > Bind by a call from the device
- Then dial the binding code (displayed on the top right corner of the screen) on the desk phone you would like to use
Computer
- Select Bind softphone to make calls directly through your computer using a headset or microphone + speakers.
- You may be required to select your audio device under Settings > Softphone
External Phone
- Enter an external phone number here.
- When you make or receive a call in ZAC, the system will call that number.
- Answer it to complete the call.
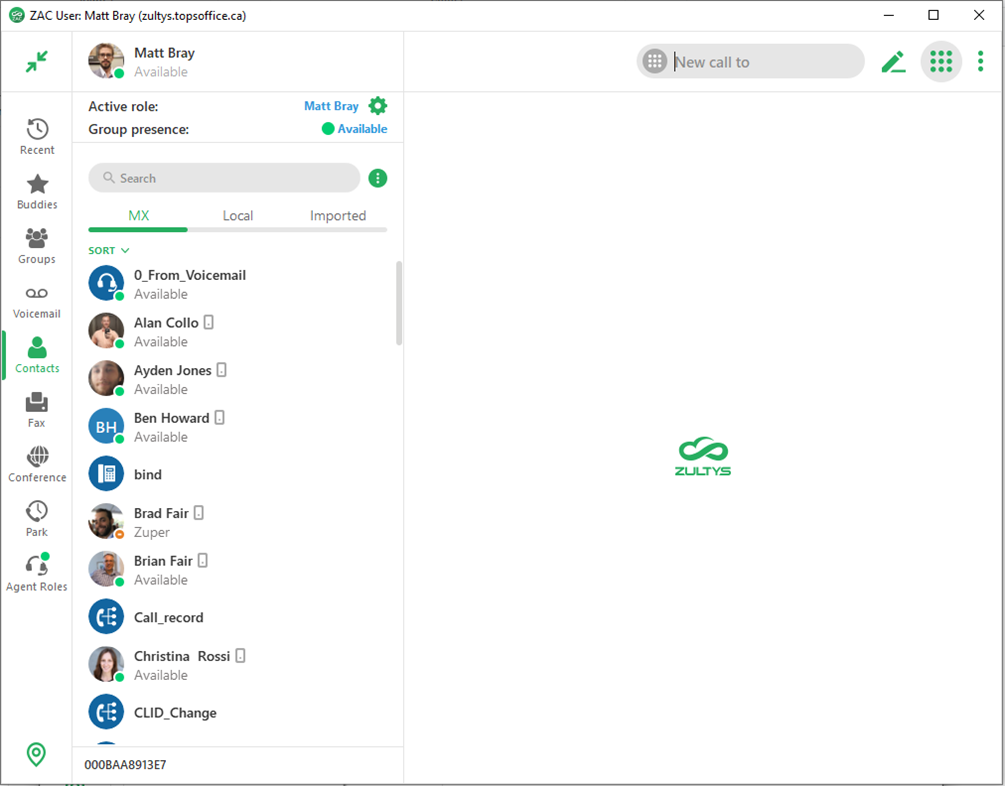
Contacts / Buddies
Contacts displays all the users on the system and their current status, a local list of contacts visible only to you, and contacts imported from Microsoft Outlook or other sources. Buddies is a list of your favorite contacts.
Adding a contact as a buddy will allow your contacts to be saved to the phone system, and backed up. If you do not mark them as a buddy, they will stay only on your current computer. If something happened to your computer, your contacts are not be recoverable unless saved as a buddy prior.
Contacts
- Click on a contact to open a tab with recent call and chat history.
- To add a contact to your Local contact list,
press the green icon beside the search bar and select “Add Contact”.
Buddies
- To add a contact to your Buddies list, right-click on the contact and press “Add to Buddies”.
- Transfer a call by drag-and-dropping the call bar onto a contact.
Chat & Call History
When you click on a phone number or name in your Contacts or Recent windows, a new tab is opened that displays all your call and chat history with that person. You can:
- Call
- Send SMS through chat*
- Send attachments via drag-and-drop (internal only)
- Start a screenshare (internal)
Some options will be disabled when looking at an external phone number or an offline user.
*requires additional license/purchase
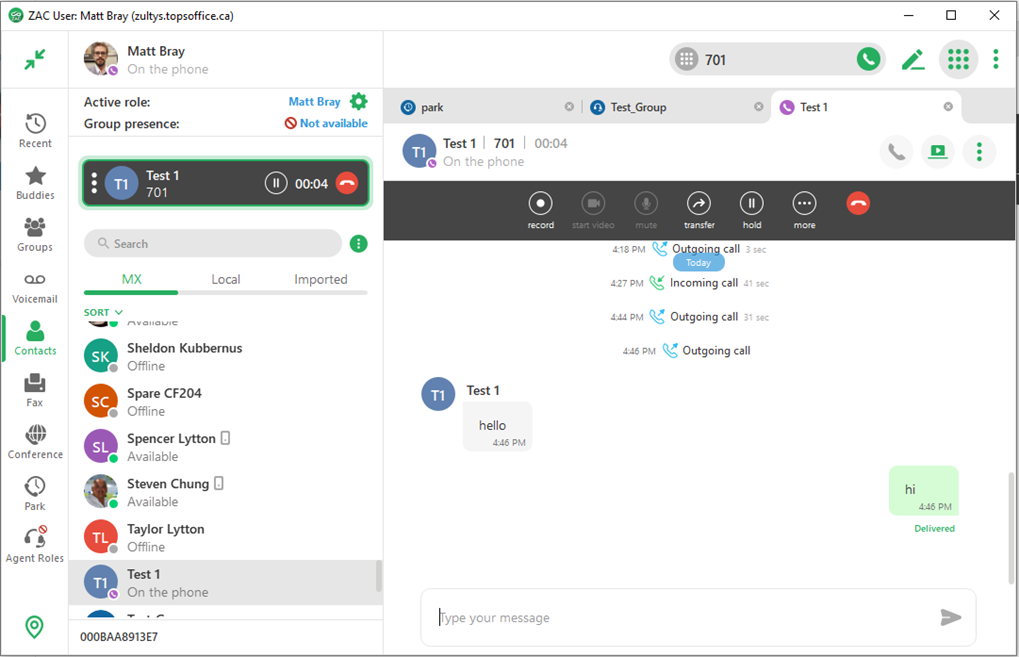
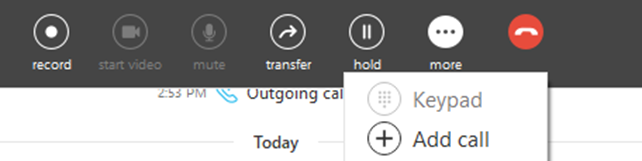
Call Control
While on an active call, you may perform various functions. On an active call, you may click into the call by clicking on the smaller black box on the left hand side.
Once you have clicked on it, it will display the larger screen, with recent chats/calls, as well as a larger black box with various options.
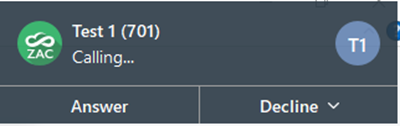
Answering A Call
When receiving a call, a popup will appear in the corner of your screen.
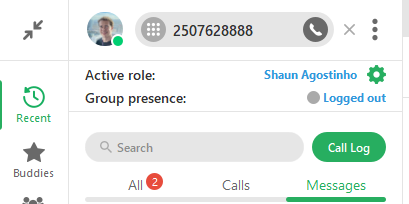
Placing A Call
- To place a call, press the 3x3 dot grid near the top of the application by your name/presence.
- It will then give you a field to enter the number.
- Once entered, press the phone icon beside the input field.
Ending Calls
- Press the red end call button to end a call

Blind Transfer
Press the transfer icon, then click a user or phone number OR drag and drop the call bar onto anybody in your contacts or buddies list.

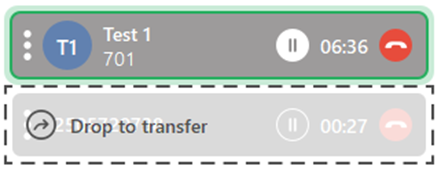
Attended Transfer
- Press More then + Add call
- Call another user or phone number – the first call is automatically put on hold
- After consultation, drag-and-drop one call onto the other:
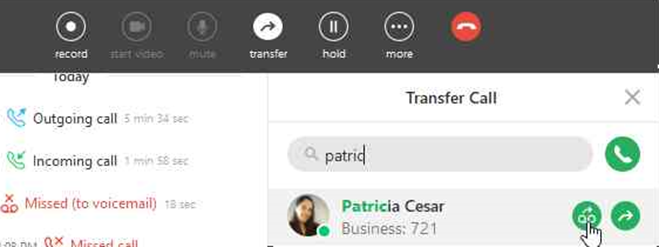
Transfer to Voicemail
Press the transfer icon, then find a user, and hover over. It should give you an option to transfer to their voicemail.
Hold
Putting a call on hold, will keep it on your phone. The other end will hear hold music, but no one else can "take" the call.
Park
Parking allows you to put a call in the parking lot where others are able to pick it up. This could be considered somewhat of a "global hold" or a "hold slot".
Record Call*
Press the Record icon on the call bar at any point during the call – the entire call will be recorded.
*this feature requires additional licensing
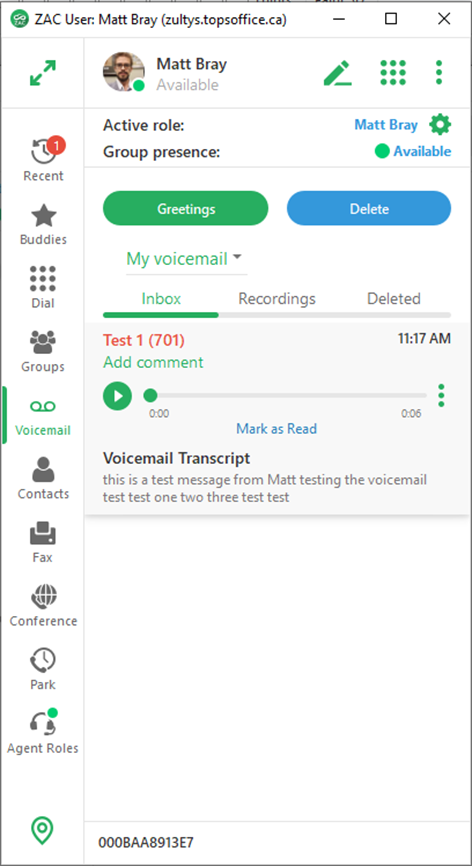
Voicemail
From the Voicemail screen you can manage your voicemail messages and change your greetings.
- Press the play button beside each voicemail to listen to it.
- Press more options to delete, forward, or save the message.
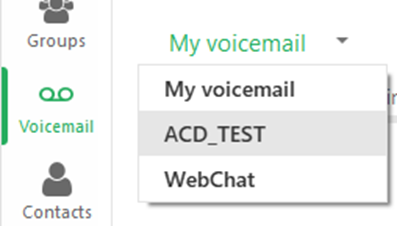
- If you are signed into a call group, press the drop-down beside My voicemail to view group messages.
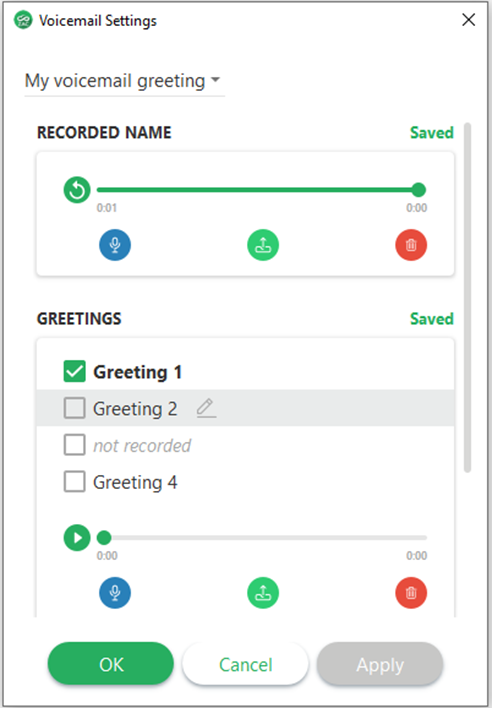
Greetings
- Press the Greetings icon - You can listen to your current name and greetings, re-record them through your computer, or upload a pre-recorded file.
- Select the checkmark beside the greeting you would like callers to hear.
- To record greetings through your phone, dial *86 and follow the audio prompts.
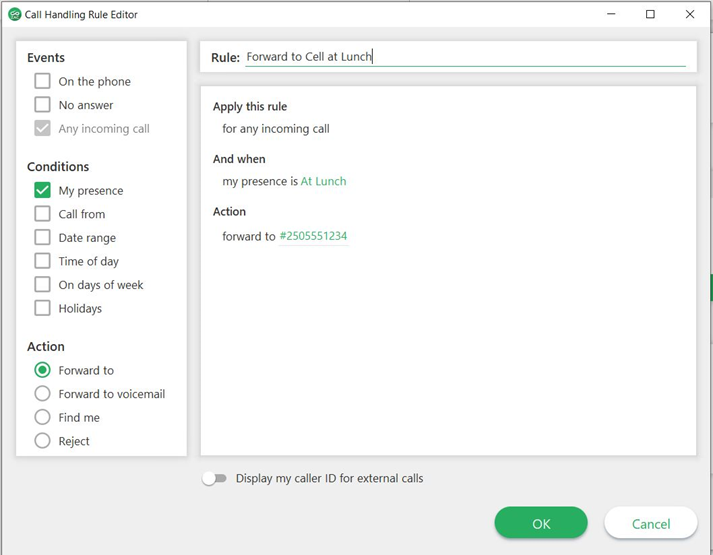
Call Handling
Call handling rules allow you to customize your phone. You can program all your calls to go to straight to voicemail at 5pm, forward your extension to another user when you are on vacation, or play a personalized voicemail greeting for a special caller.
- Select the settings menu from the 3 vertical dots near the top left.
- From the tabs at the top of the new window, select "Call Handling"

Creating a Rule
- Press the + button to create a new rule
- In the Rule Editor window:
- Name your new rule
- Choose an Event to initiate the rule
- (Optional) specify Conditions to apply to the rule
- Set an Action for the rule
- Press Ok
- Press Apply in the Settings window
Notification Rules
To set up Notification Rules, follow a process similar to configuring Call Handling rules. Instead of navigating to the 'Call Handling' section within the settings tab, access the 'Notification Rules' tab.
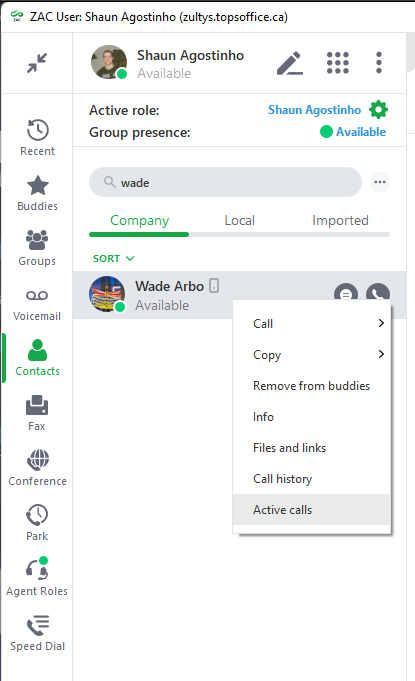
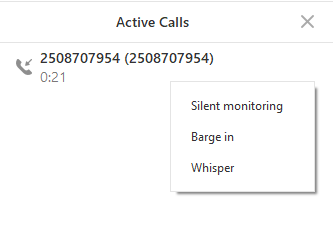
Call Monitoring / Barge
If your account / other accounts have the correct user profile permissions, you may either be barged into by others, or you may monitor/barge into other calls.
To barge/monitor someone's calls, please see the following.
- Go to the Contacts tab on ZAC
- While a user is on a call, and it says On the Phone, right click the user and select Active Calls
- It will open a side tab when looking at the chat with them. Their active calls will be listed on the right had side of the window.
- Select if you'd like to Monitor, Barge In, or Whisper
Call Groups
In ZAC, call groups are called Roles. If you are a member of any call groups, you can log into the group(s) by pressing the Select roles icon and enabling the desired role:
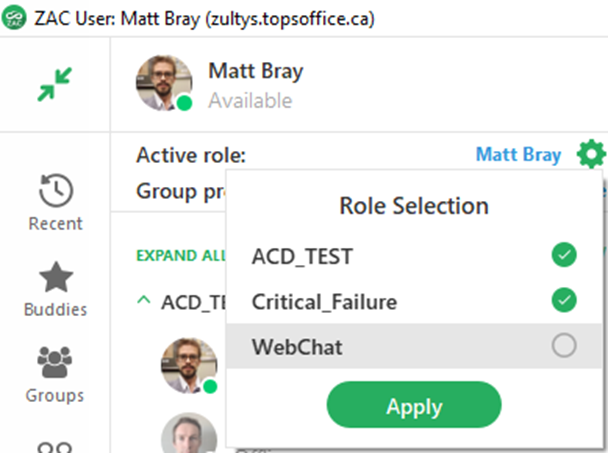
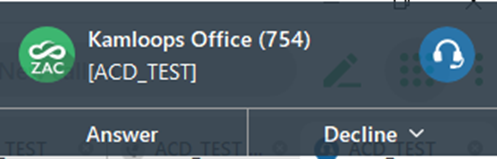
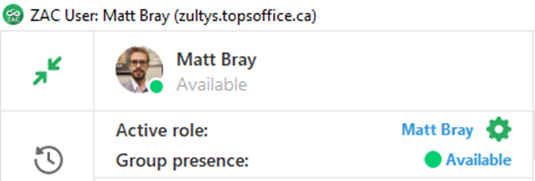
When the Role is enabled you will receive group calls according to the call distribution settings programmed by the administrator. On all group calls, the name of the group will be displayed in the call bar and on your bound phone:
In the Voicemail screen, you will see group voicemails by pressing the drop-down beside My voicemail and selecting the group.
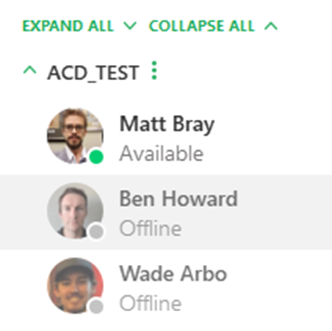
In the Agent Roles sub-menu you can see other group members and their current Group presence status (available, not available, or logged out):
Change your Group presence to Not Available to stop receiving group calls.
If you change your active role, outbound calls will display the group caller ID if applicable.
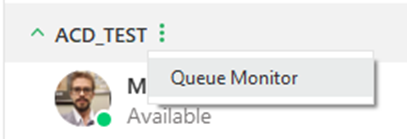
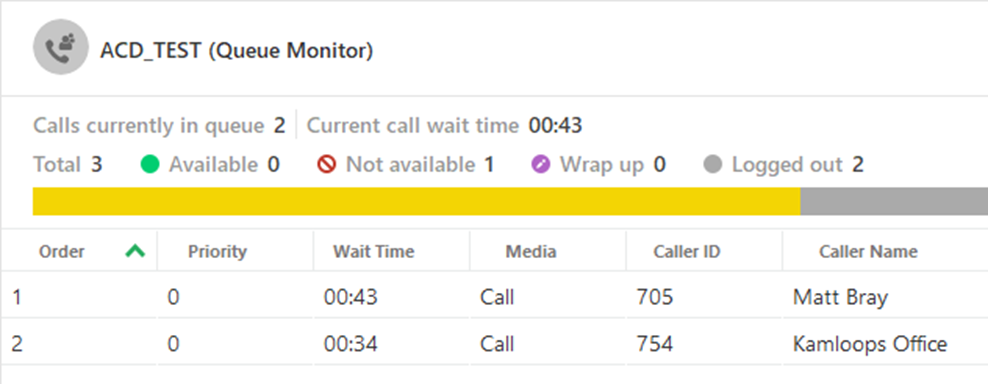
Queue Monitor
To access the Queue Monitor window, click on Agent Roles and press the ellipsis beside the role name, and then select Queue Monitor. If the group is programmed to queue incoming calls until the next member is available, you can view all the callers waiting in the queue.
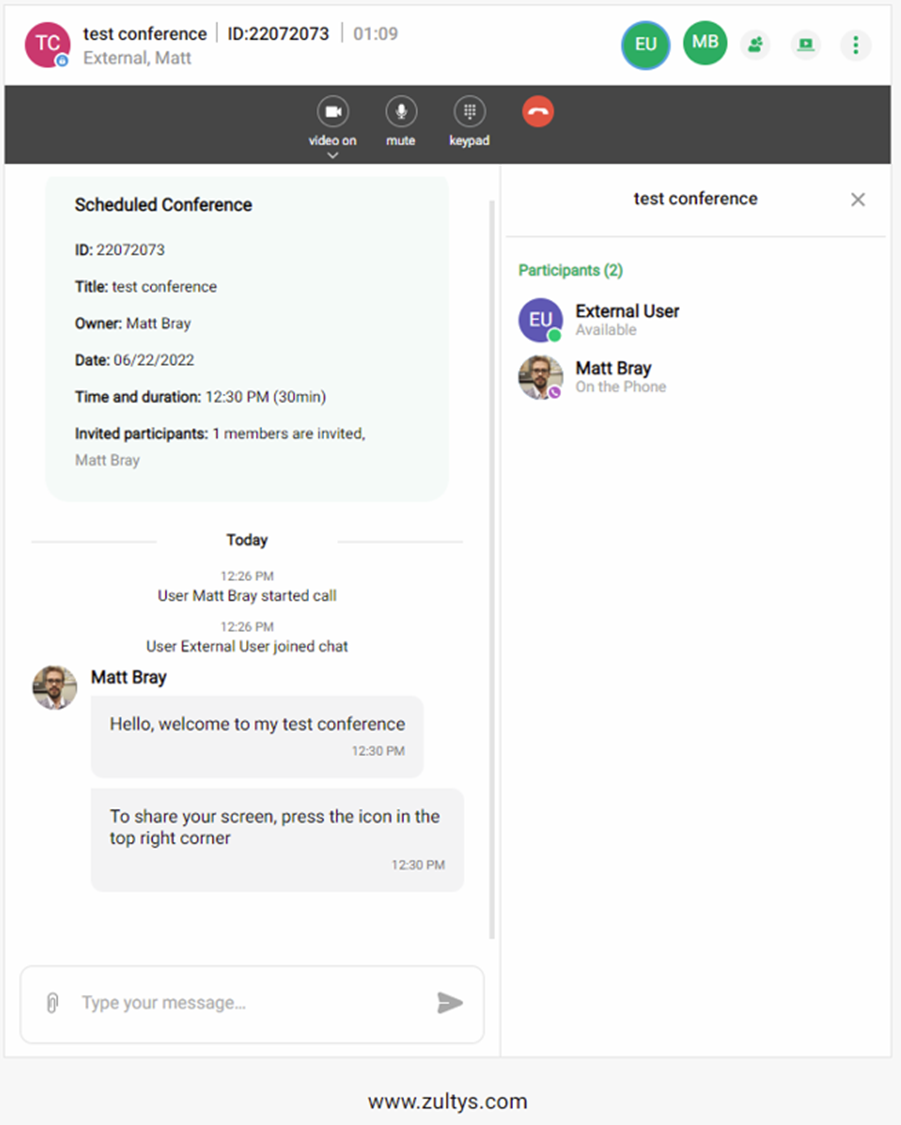
Conferencing
From the Conference screen, you can schedule a multi-media conference and invite other parties.
Click on the Conference icon and press Schedule
- Name your conference
- Add other internal users as participants
- Set the maximum number of external callers – this is the number of outside parties expected to join the conference
- Select a date and time for the conference to take place
- Set the expected duration - if the conference goes over the time limit it will not end, however new participants will be unable to join
- Set the type as either once or recurring– if you set recurring you will be asked how often the conference should be repeated
- Set the password for external parties to access the web or leave it blank
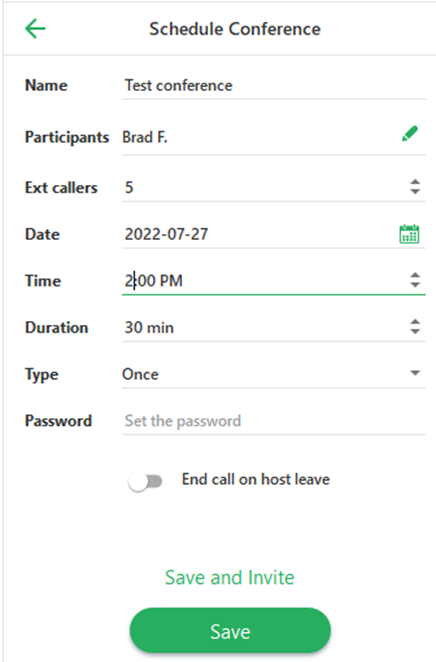
- If a password is set, it must be shared with the other participants
- If no password is set, anybody with the conference link can join the conference
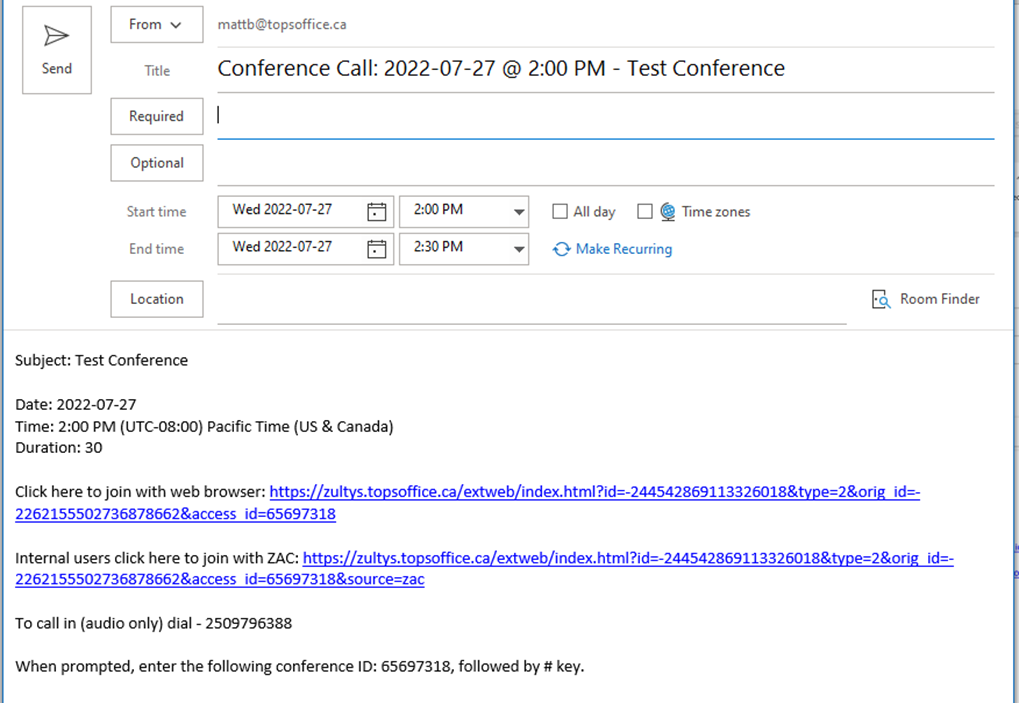
When you have finished press Save and Invite. A conference invitation will open in Microsoft Outlook which includes all the information required for an external party to join the conference, either via telephone or web.
Invitation
Add the required and optional participants and send the invite.
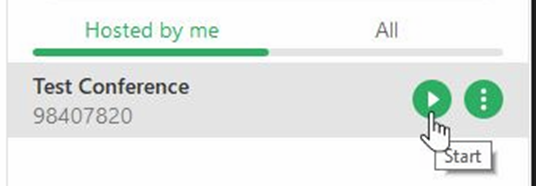
You can start the conference 15 minutes before the scheduled start time. When you are ready to start, press the start button in ZAC:
Conference Features
During the conference, you can share your video and your screen with other ZAC or web participants by pressing the Start Video or Start Screen Sharing icons.
As the conference leader you can mute/unmute or disconnect other parties.
You can also invite other users on the system to the conference after it has started by pressing the Add button.
To invite external users, press Copy Link, then create a new email and paste the link from your clipboard.
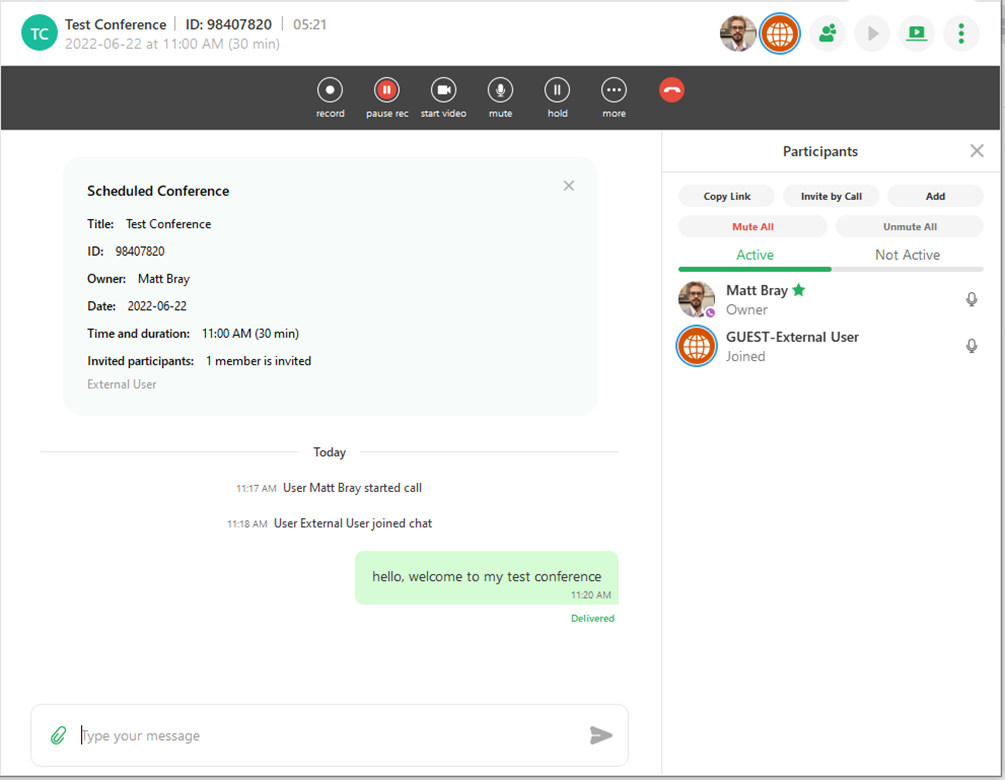
*call recording requires an additional license
External Users
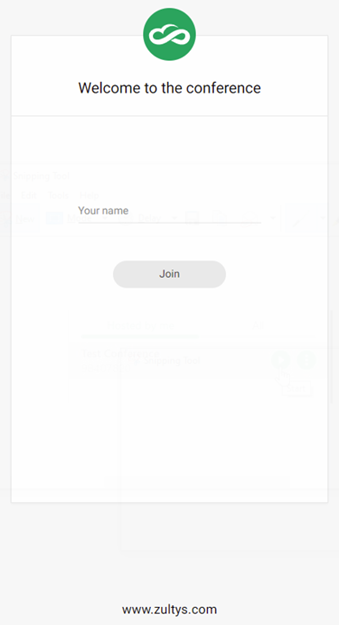
When a participant clicks on the web link in the invite, they are asked to enter their name. If a password was set for the conference, they are also asked to enter the password.
After they have entered their name, they will see the chat and any screensharing or video that is active at the time. To join the audio, they must press Join Call.
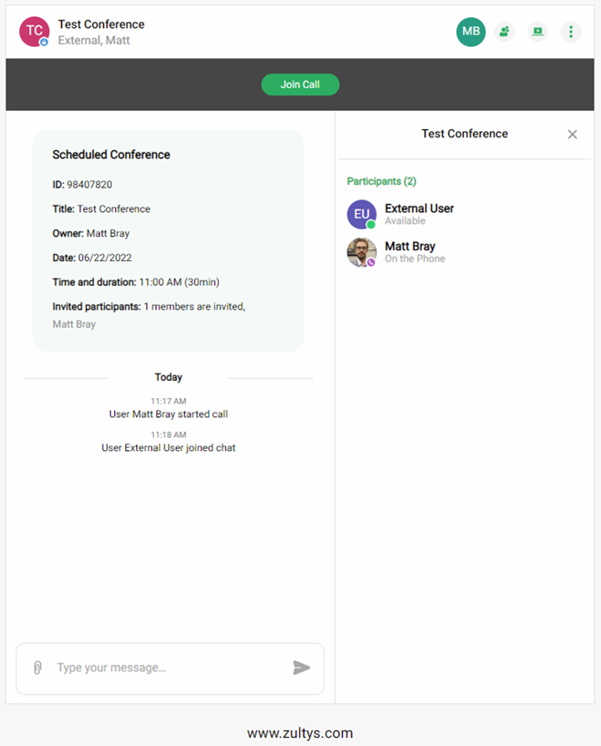
Using Computer Audio
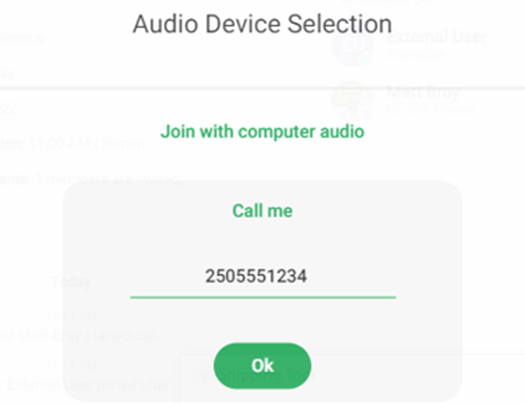
After pressing Join Call, they will be prompted to join with computer audio, or through a phone call:

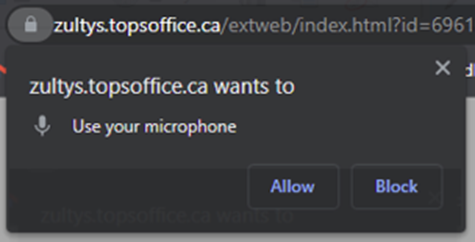
If they select computer audio, they may see a browser permission check which must be allowed:
Receiving a Call to Cell/Mobile
If they select Call Me, they are prompted to enter their phone number. After entering their phone number they must press Join Call again. The system will call the phone number entered and add them to the conference automatically.
Once they have joined the audio, they will have full access to the conference. They can enable video or share their screen. They can view other users shared screens or video.