Zultys - MXAdmin

Please note this document is reduced and only includes commonly changed settings. If you would like to make changes not outlined in this document, please contact our support team.
Install / Login
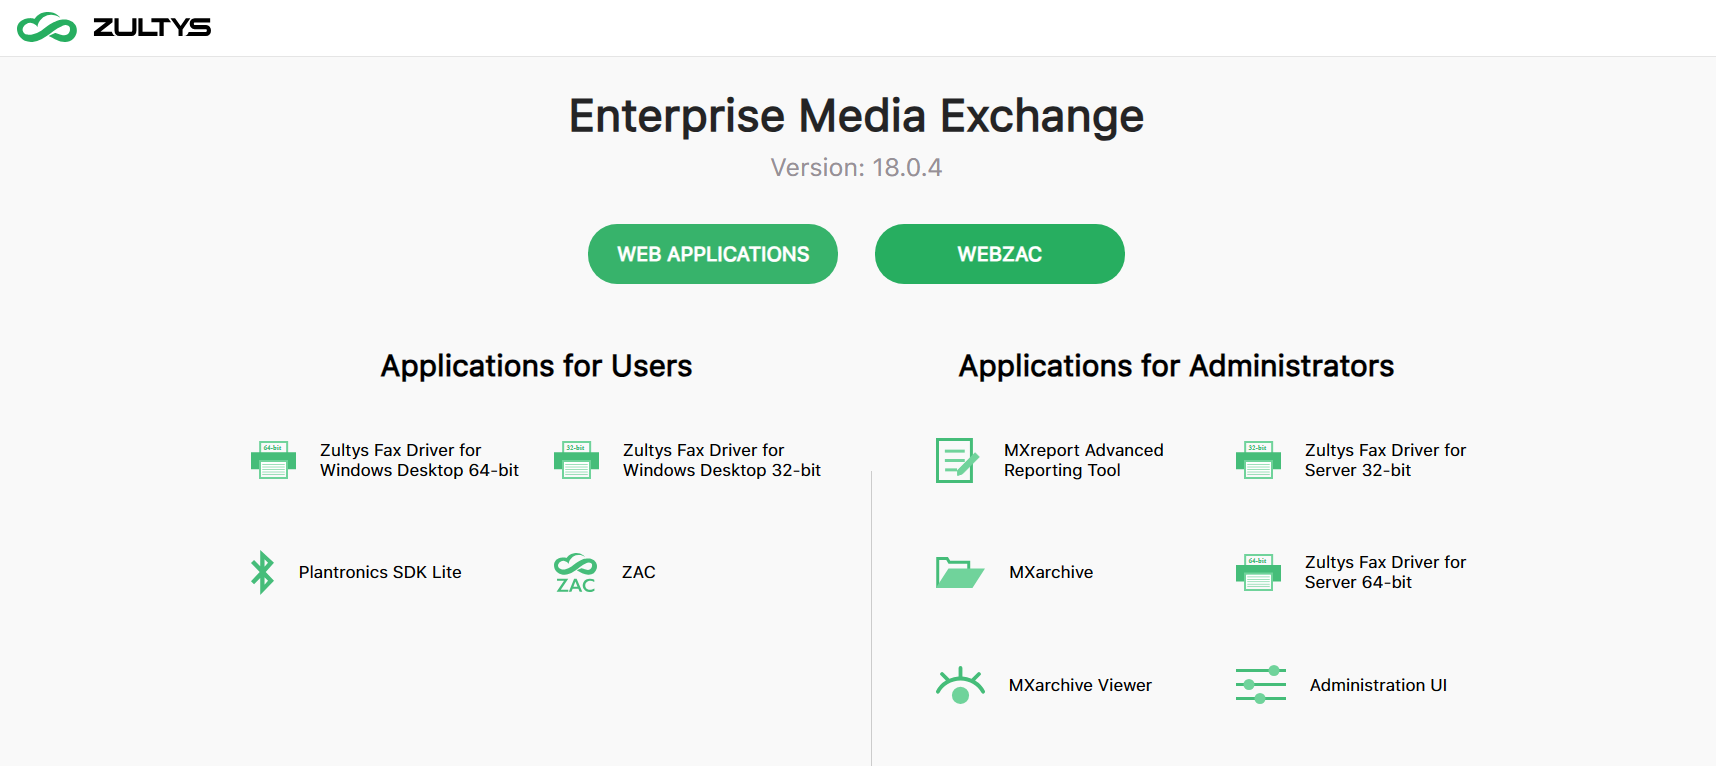
- *Visit your company's Zultys MX webpage.
- Click "Administration UI" (this will download an .exe installation tool)
- Once the installer is downloaded, open it and follow on-screen instructions.
- Once installed, navigate to the searchbar on your Windows computer, and open MXAdmin.
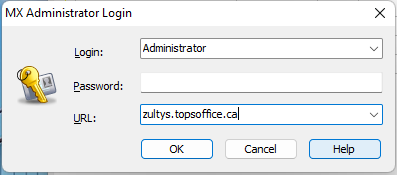
- *After opening, you will see a dialogue box to enter your login, password, and URL/hostname.
- *After logging in you will be prompted with this screen (see images below).
Password (your password used for ZAC/mobile app),
URL (company hostname/server address used in ZAC and mobile apps)
Web-based administration is also available on your company's Zultys MX webpage, however the web admin portal is still in development and some settings can only be modified by using the MXadmin software as described in this document.
Menus
Various configurable settings can be found within MXAdmin. Please see the following list of commonly edited settings available to you. If there is a change you require that is not available on your account, please contact our support team.
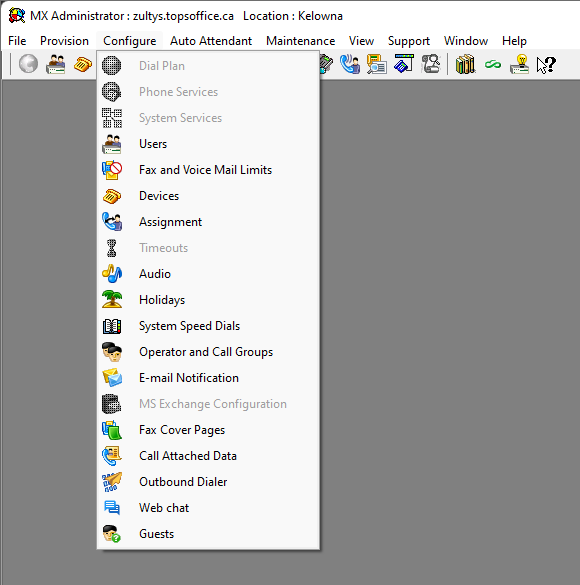
Configure
From the configure tab, you may configure the following:
- Users:
Update user extensions, names, emails, passwords, and pins. - Devices & Device Assignment:
Edit device buttons and assignment. - Audio: (Music on Hold)
Add or remove music on hold recordings. - Operator and Call Groups:
Add, remove or modify call group settings. - Holidays:
Edit system holidays, impacting auto attendant schedule and call handling rules. - System Speed Dials:
Edit system speed dials viewed on devices and ZAC/mobile app. - Fax and Voicemail Limits:
Edit system default limits for voicemail and faxes. - Fax Cover Pages (if applicable)
- Call Attached Data (if applicable)
- Outbound Dialer (if applicable)
- Web Chat (if applicable)
- Guests (if applicable)
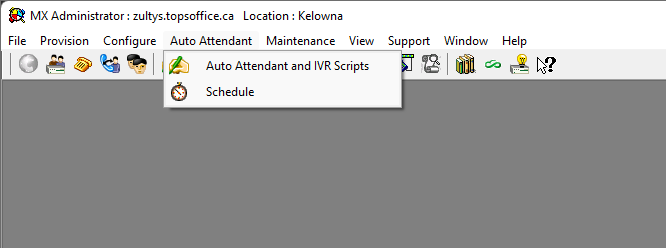
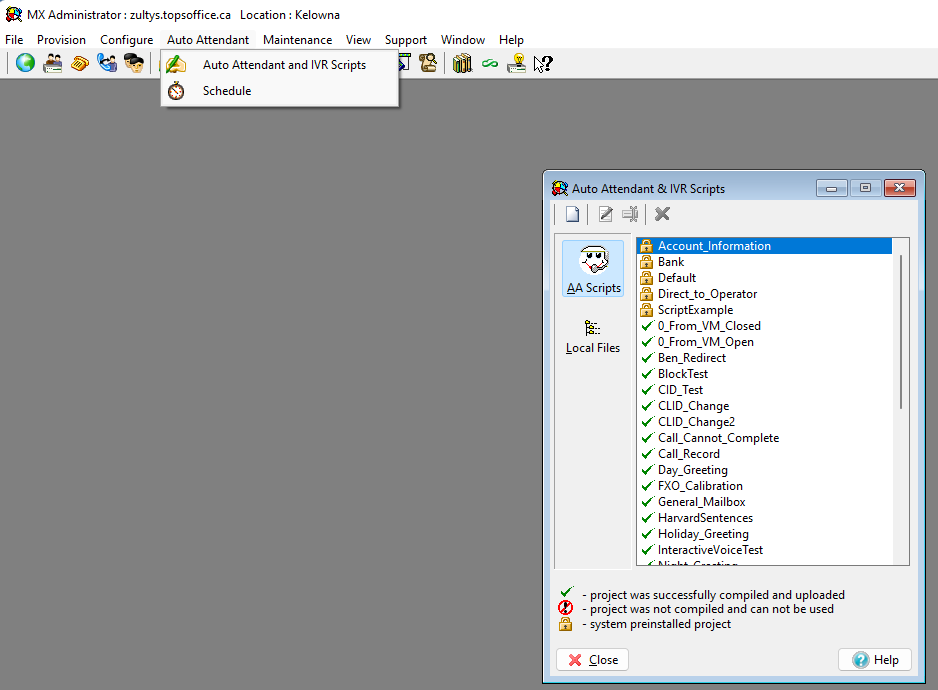
Auto Attendant
From the Auto Attendant tab, you may configure the following:
- Auto Attendant and IVR Scripts:
Configure single-digit menu options, redirects, and audio recordings in the AA. - Schedule:
Configure your business hours or specific department hours, along with special closed time/date ranges that affect your whole company or department.
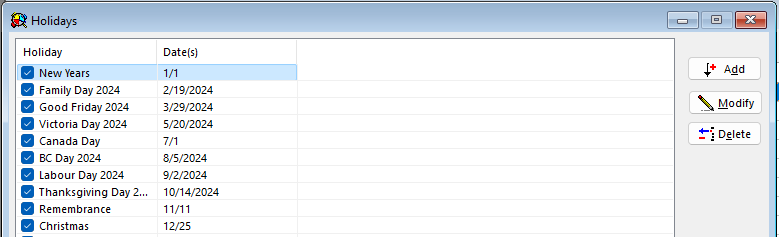
Holidays
Holidays allow your system to automatically play closed greetings or other messages. This will also impact call handling rules.
Navigate to the Holidays menu via Configure -> Holidays
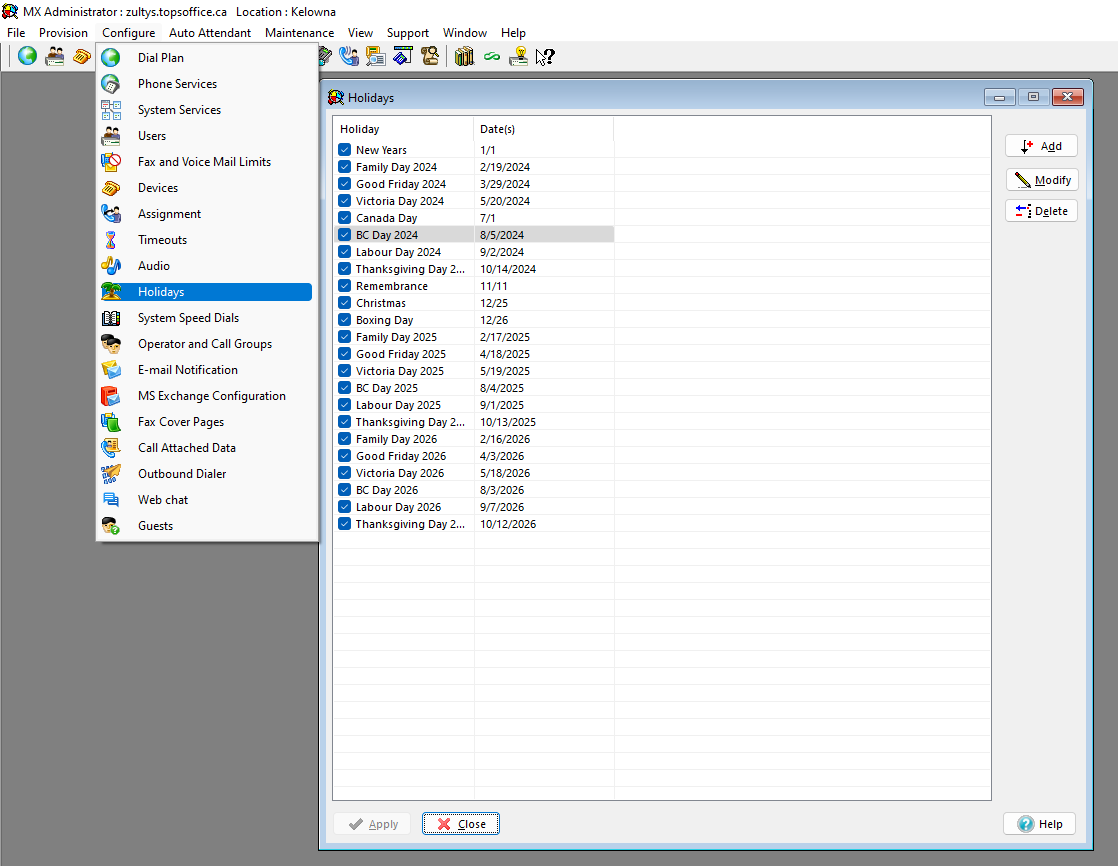
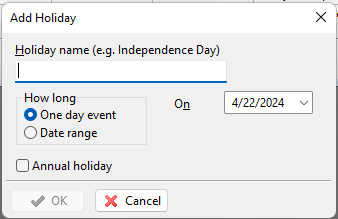
Add
- Click Add.
- Fill out the holiday information.
- Click OK.
- On the main Holiday list, click Apply.
Delete
- Select a holiday and press Delete.
- Click Apply on the main holiday list.
Modify
- Select a holiday and press Modify
- A dialogue box similar to the one used for adding a holiday will open.
- Make your changes and press OK
- Click Apply in the main holiday list
Users
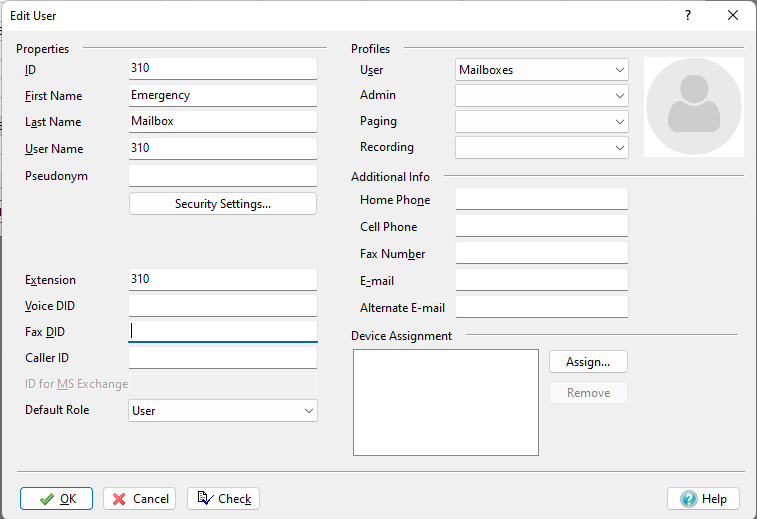
Navigate to Configure -> Users. You will then be prompted with a list of users.

Edit
- Double-click on a user, or right-click and select Edit User.
- You will then be prompted with a dialogue box with various editable options for the user.
Note: If changing the extension or similar fields, this may affect call flow from an Auto Attendant. - Click OK on Edit User dialogue.
- Press Apply in main Users list.
Password & PIN
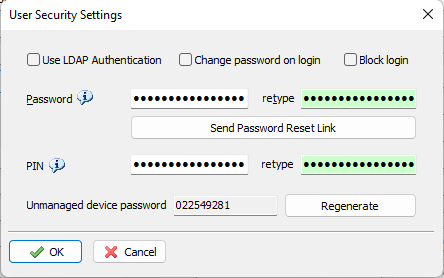
- Click Security Settings... from the Edit User dialogue
- Update the Password and/or PIN
(You may have it prompt the user to update their password on next login) - Click OK on User Security Settings dialogue
- Click OK on Edit User dialogue
- Press Apply in main Users list
Resetting a User
- Hover the mouse over a User, and then Right Click and select Reset User
- Check the box on which features you'd like reset
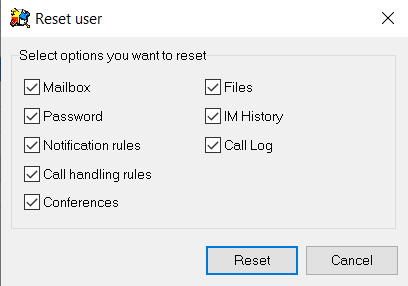
- Mailbox: Resets mailbox PIN code, greetings, and erases all messages
- Password: Resets the Users password for ZAC and mobile apps
- Notification rules: Resets all voicemail to email notifications
- Call handling rules: Resets all call handling rules on the user, both Admin made and User made
- Conferences: Resets all scheduled conferences made by the user
- Files: Clears any user files stored on the system
- IM History: Clears the Instant Message chat history of the user account
- Call Log: Clears the call history of the user account (does not erase call records)
Call Groups
Navigate to Configure -> Operators and Call Groups
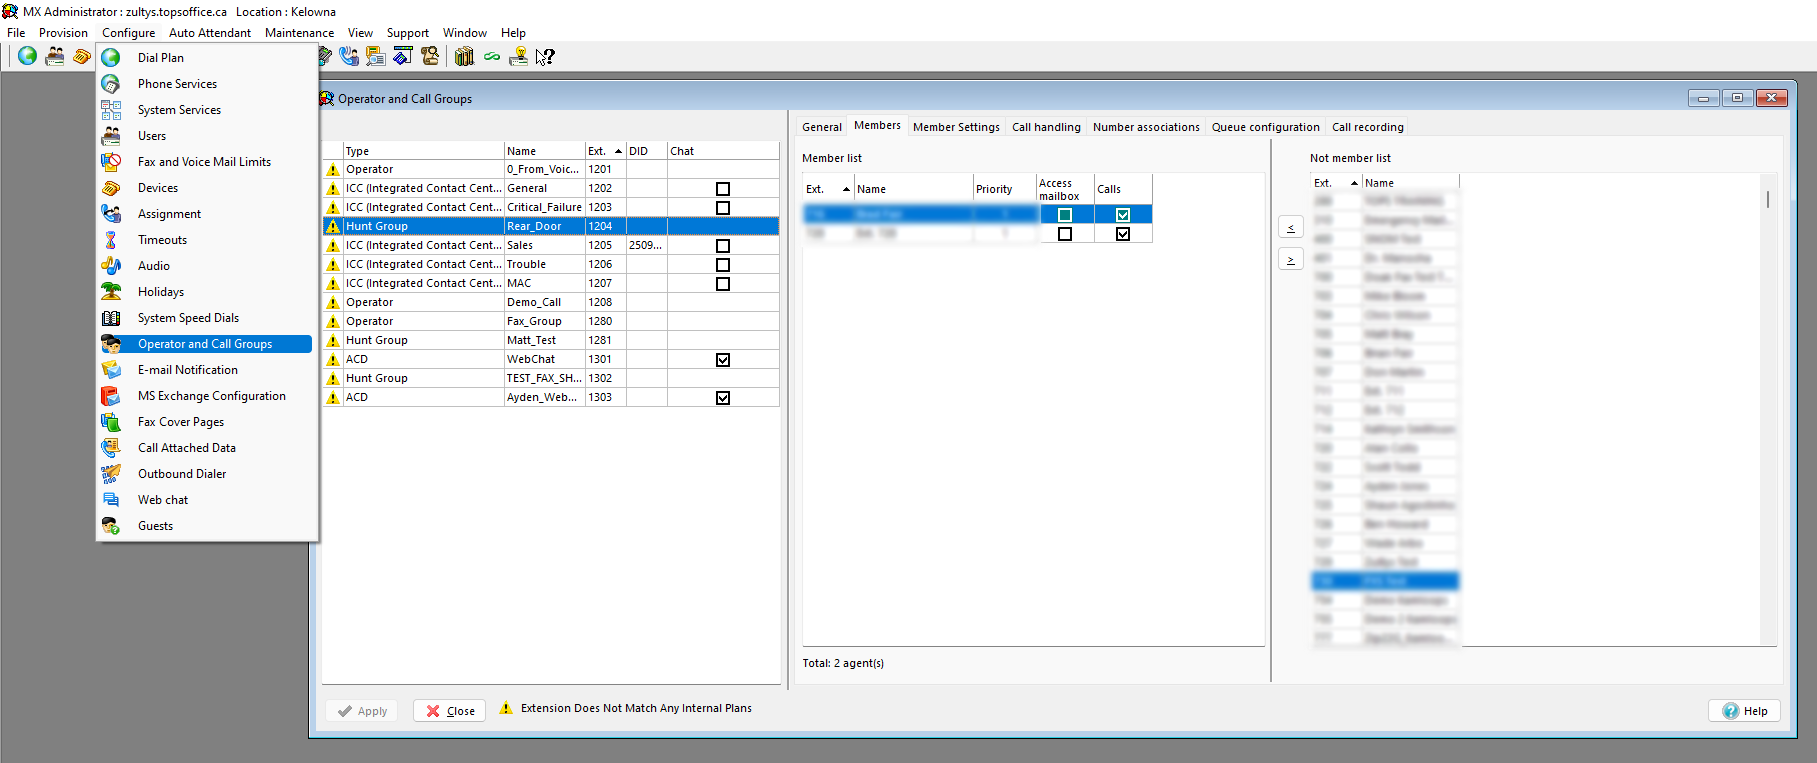
Types
There are various types of call groups.
Hunt Group - Calls will just ring to users in this group
ACD - This group requires user to actively be logged into the group, the system then allows functions such as queues to work properly by knowing who is available, and who is not
Operator - Similar to ACD, however it will receive emergency notifications (if someone calls 911)
Adding User
- Select the Call Group, and select Members tab
- Select a User that is not a member, and click the arrow pointing towards the members list.
- Choose their priority, mailbox access and access to receiving calls
- Press Apply in the main Operator and Call Groups dialogue.
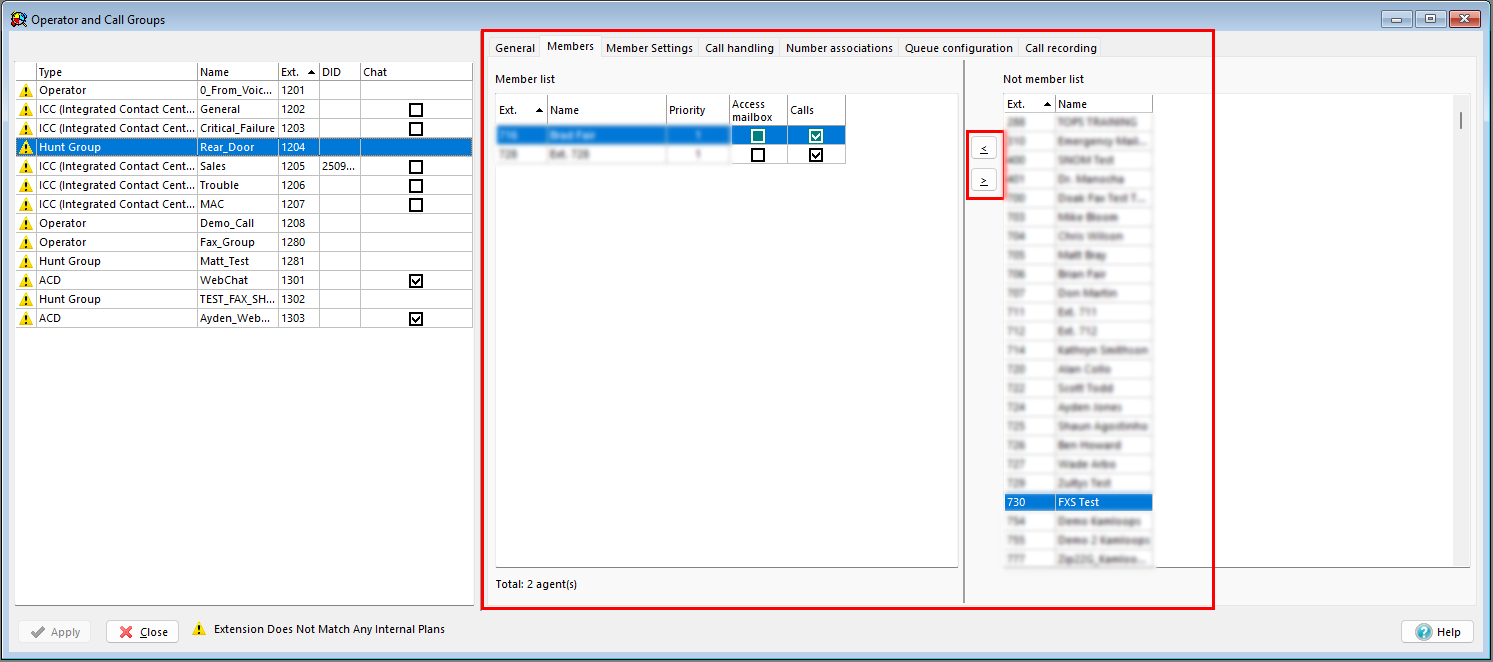
Removing User
- Select the Call Group, and select Members tab
- Select a User that is not a member, and click the arrow pointing away from the members list.
- Press Apply in the main Operator and Call Groups dialogue.

Devices
Navigate to Configure -> Devices
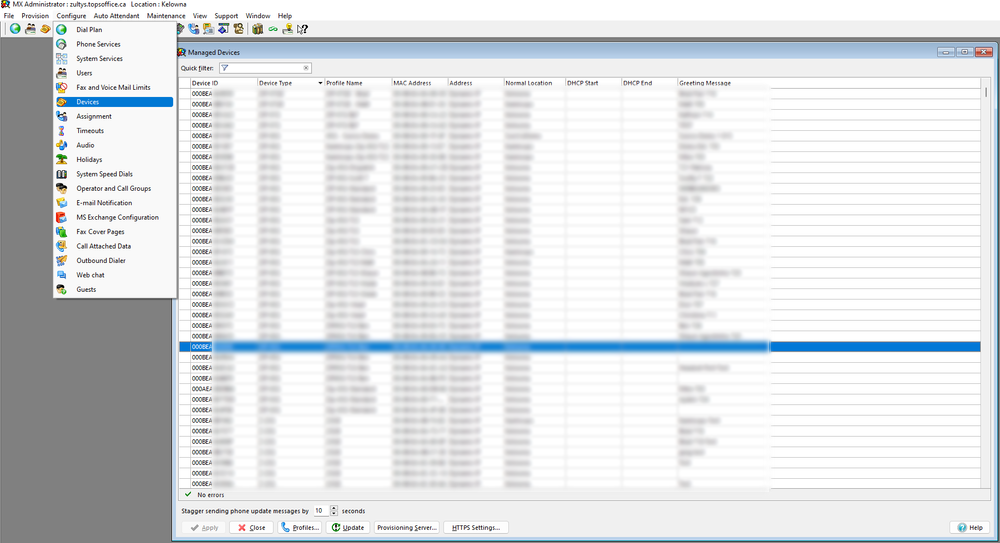
Update
After making changes to any devices, you will need to send an update to them.
- Select the devices you are wanting to send an update to (either by only doing 1 device, or selecting multiple by using the SHIFT + Click to select a range)
- After one or multiple devices are selected, press the Update button at the bottom of the Devices List
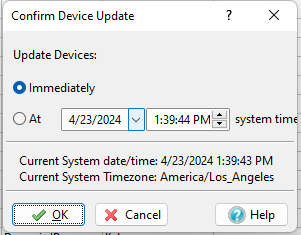
- It will open a prompt asking if you want to update the device configuration, select Yes
- You will then be prompted for confirmation, you may select a delayed time, however immediately is typically the best option
Note: When updating multiple devices, there is a 10-15 second delay between updating each device.
Profiles
Device profiles are used to change the settings across multiple devices. If you are wanting editing a single phone, it is likely on a shared profile.
- Find the device you want to edit
- Make a note of the profile name it is set to use
- Click Profiles on the bottom of the Devices list
- Find the device profile based on the device model you are wanting to modify
(eg. Z 22G, Z 23G, ZIP 45G, etc.) - Select the Device Profile

Buttons
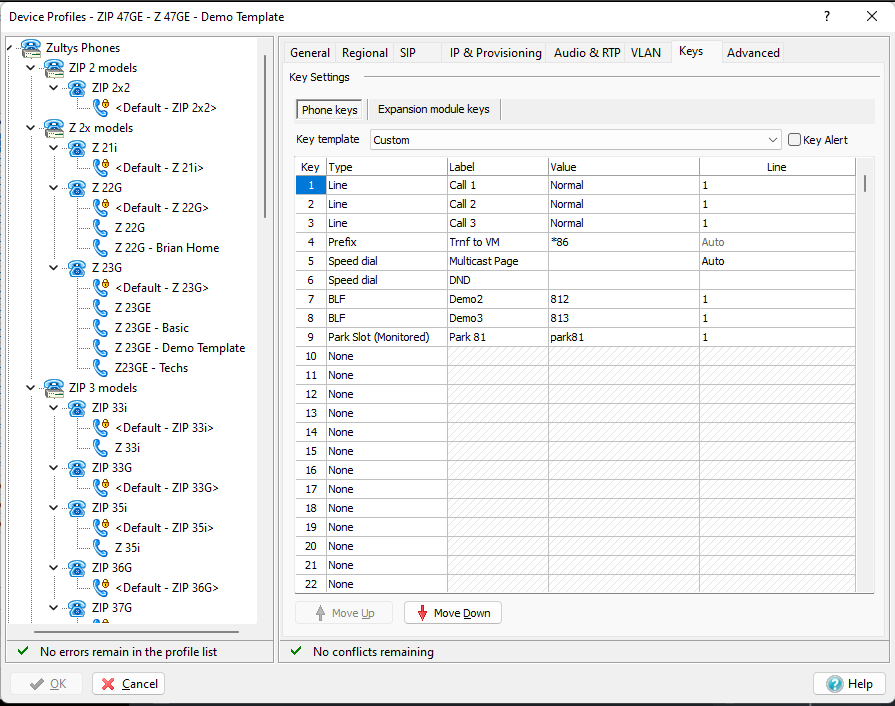
To modify programmable keys on profiles, navigate to the device profile you wish to modify using the instructions above.
- On the device profile, select the Keys tab
- Within the Keys tab, select the Programmable Keys sub-menu
- Add or Modify the keys you wish by selecting empty key values or existing ones
Button Types
- Line - Line key used for having multiple active calls
- BLF - Used for extension statuses / one touch extension buttons
- Speed Dial - Dial a code or phone number with a single press
- Mailbox MWI - View status of mailbox, or if there are unread messages
- Login - Used to login to call groups
- Park Slot (Monitored) - View status of park slot & have 1 touch button for parking calls in a specific slot
Naming
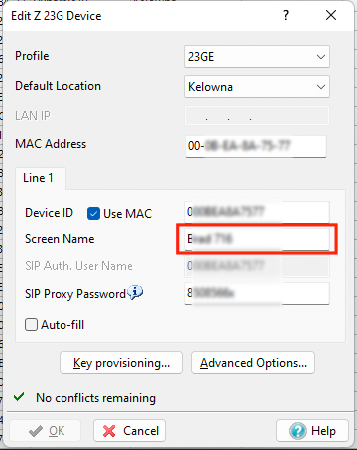
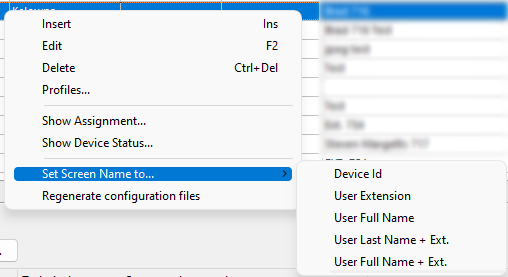
There are 2 ways to update the names on phones.
- Double click on the phone you'd like to update
- Edit the Screen Name
- Click OK then Apply in the main Devices list
- Right click on the device you'd like to rename
- Select Set Screen Name to... and select the naming format
- Click Apply and send the Update to the phone/device
Speed Dials
Navigate to Configure -> Speed Dial
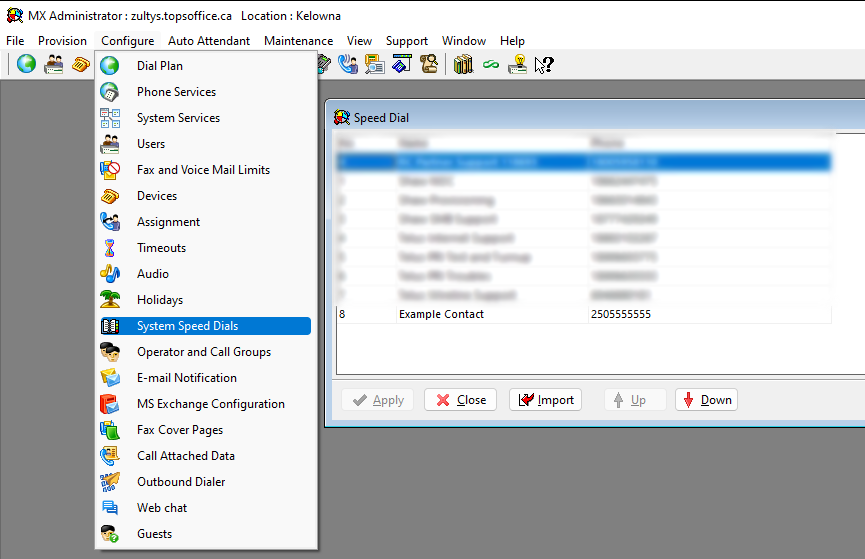
Add
- To add a speed dial, right click in the empty space and click Add
- A new row will be added to the bottom of the speed dial list
- Enter the associated name, and number in the new row
- Press Apply on the bottom left
Delete
- Click on the speed dial you would like to delete, and ensure it is selected
- Right click on it, and press Delete
- After deleting, make sure to Apply the changes with the button in the bottom left
Audio
When adding music on hold, we recommend using the default System playlist.
Creating other playlists can be used for call groups, or call queue specific music.
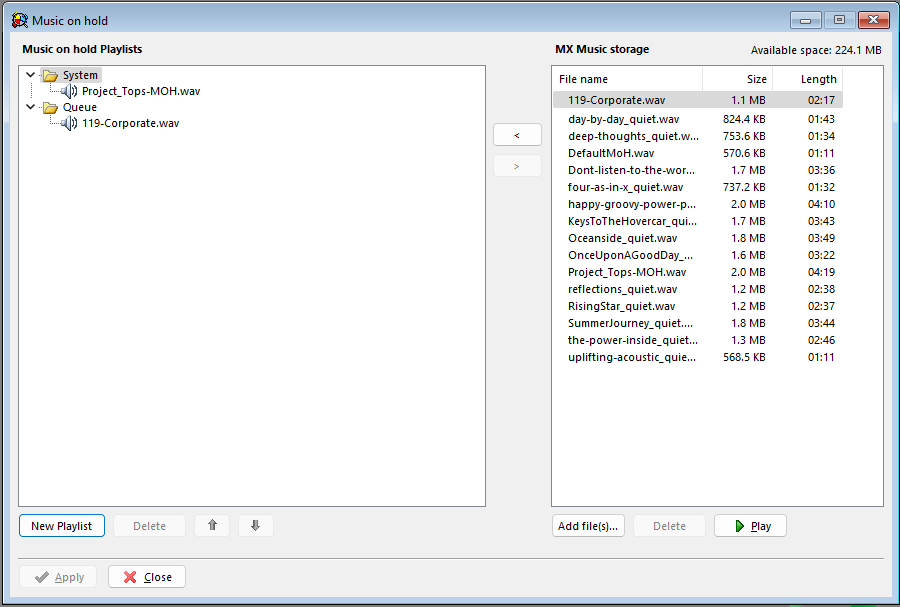
Add
- Click Add file(s)... on the right had side and select a audio file
(the audio file must be in the format of a .WAV uLaw 8Khz, if your file is not in this format, we recommend using G711.org) - Once uploaded, select it in the list of MX Music Storage and click the arrow pointing towards the Music on hold Playlists box
- Click Apply
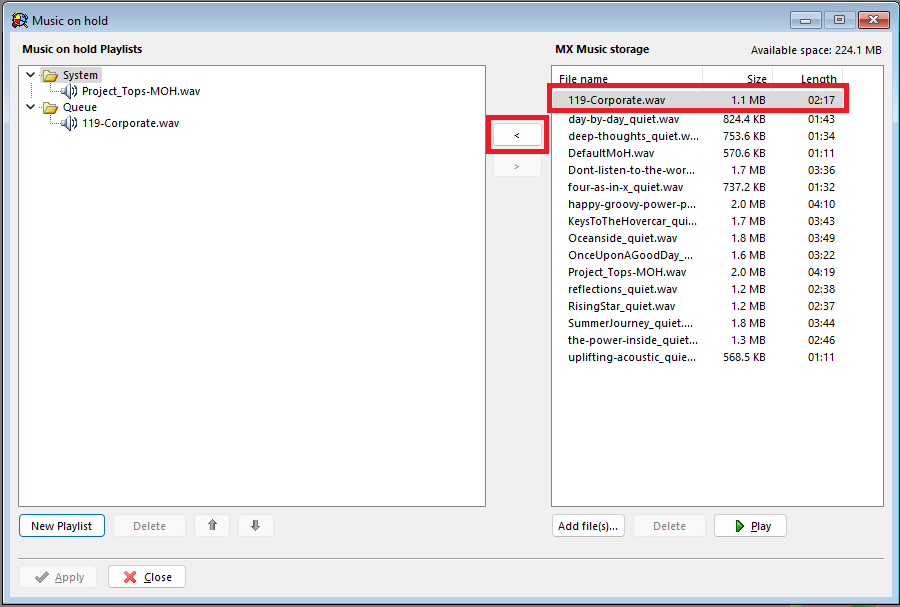
Remove
- Select the file to be removed in the Music on hold Playlists box on the left
- Click the arrow pointing towards the right MX Music Storage box
- Click Apply

Auto Attendant / IVR (Interactive Voice Response)
Auto Attendants allow you to setup automated call routing using single digit options and schedules. We will only be going into detail on how to modify single digit options and upload new greetings.
You will need to know the correct script you would like to modify. Please see the schedule section below, on how to confirm which script to modify.
Navigate to Auto Attendant -> Auto Attendant and IVR Scripts
Single Digit Options
From within the script you would like to edit, you will be show a menu similar to the following.
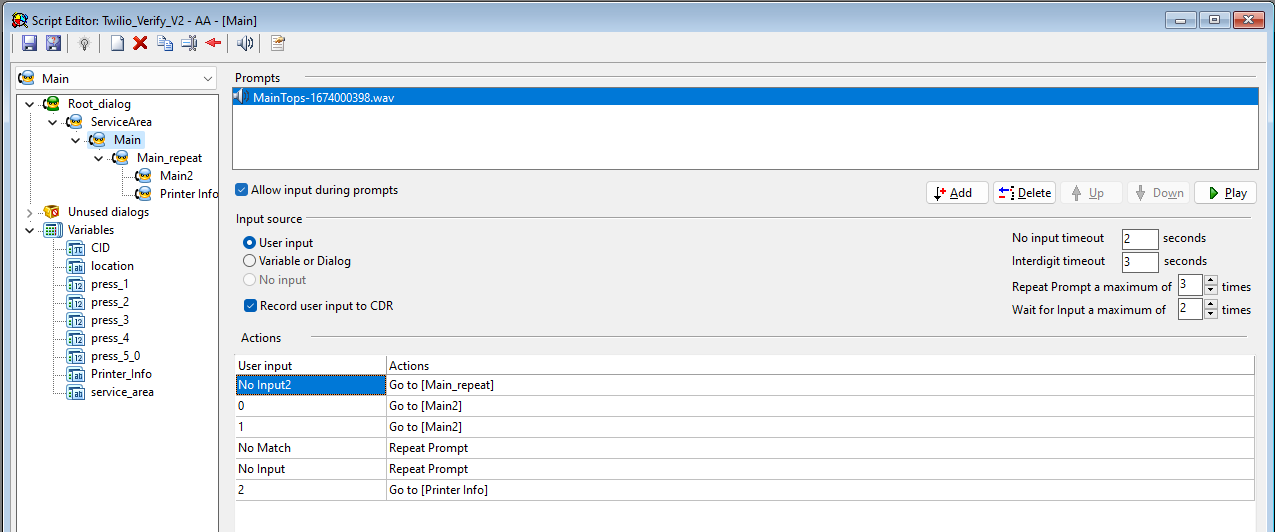
To edit the single digit options, please see the following:
- Select the option in the Actions you would like to modify
- Double click on the option to modify the action
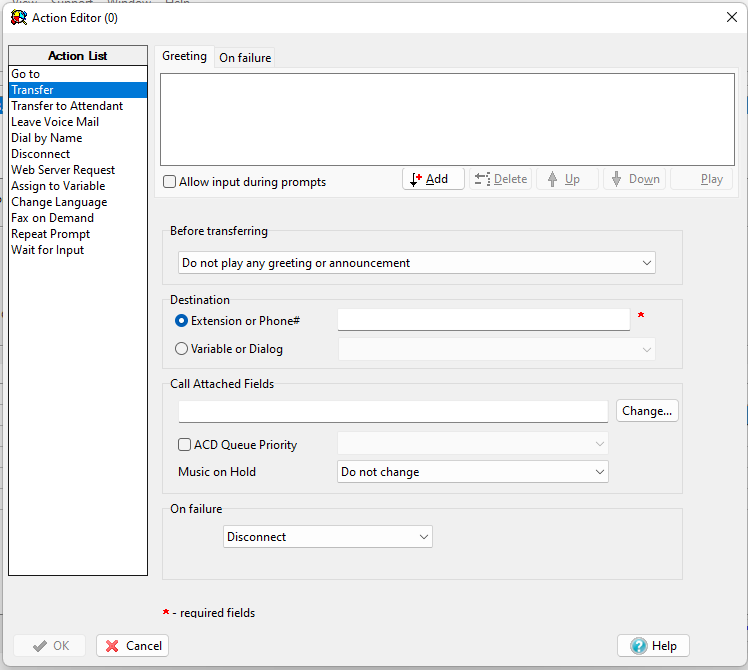
- It will open the Action Editor
- Select the action type, or modify the values in the selected action
- Press OK and Save the script using the Floppy Disk icon
Action Types (common ones)
Go to - Used to redirect call to another script within the current script
Transfer - Transfer to another extension, call group, or other
Leave Voice Mail - Transfer directly to an extension's voicemail
Dial by Name - Allows for dial by name input
Disconnect - Disconnects the current caller
Repeat Prompt - Repeats the prompt
Record Custom Audio Prompts
To record a prompt yourself and upload it to an IVR script:
- Ensure you have a voicemail to email Notification Rule on your user account that forwards your voicemails to an email address you can access
-OR-
Ensure you have access to ZAC and the mailbox you're leaving the message to.
2. Dial *86 to call into the voicemail system.
3. Enter in your mailbox PIN code and press #.
4. Press 3 to send a message.
5. Dial your extension number (or the number of the mailbox with the voicemail to email rules) and press #.
6. Press # again to finish entering ricipients.
7. Record your prompt when directed.
8. Once you've finished recording, you can listen to it for review by dialing 2 for sending options, then 3 to replay the message.
9. To finish recording and send the message, dial 1 or hangup.
10. Save the .WAV file that was sent to the email of the mailbox. Doesn't matter where you save it, as long as you remember where.
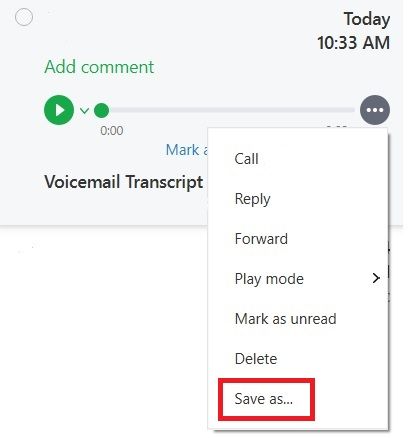
-OR-
Go to your voicemail tab in ZAC and click the virticle elipses next to the voicemail you just made, and select Save as... to save the .WAV file.
11. In the IVR editor window, click on Add.
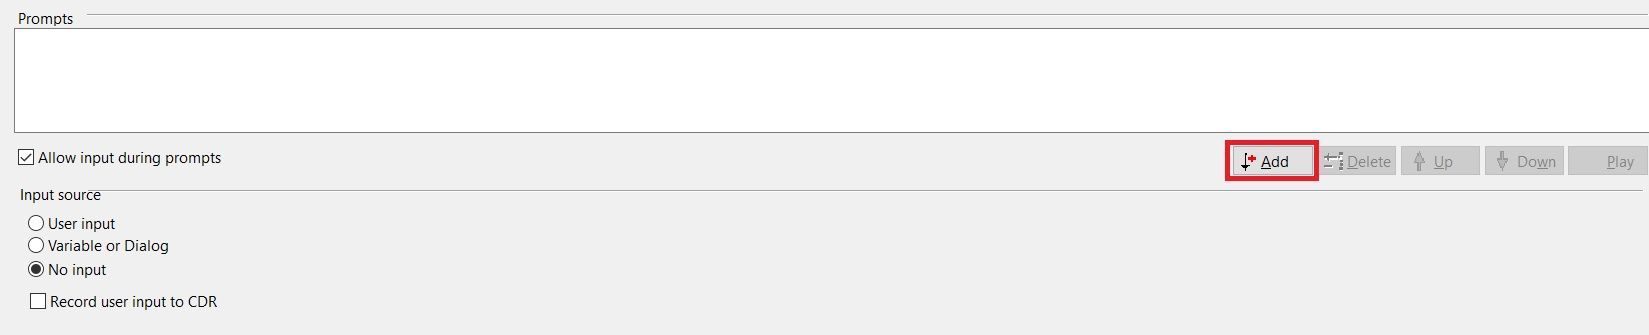
12. In the Prompt pop-up window, click on New...
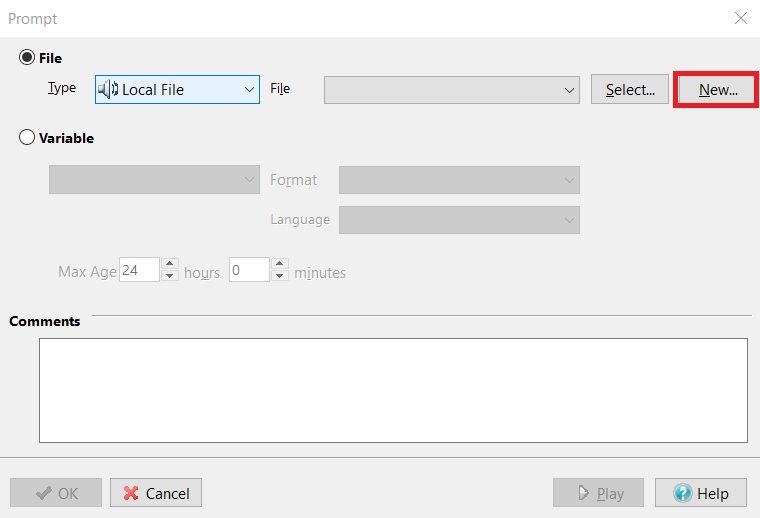
13. Select the .WAV file you saved earlier, and then click OK to save.
Your custom audio prompt will now play for callers who reach this Auto Attendant / IVR script.
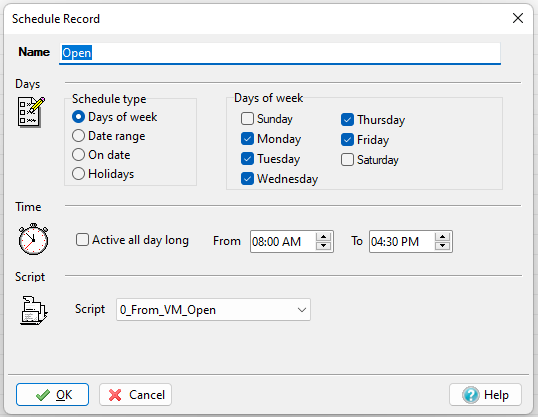
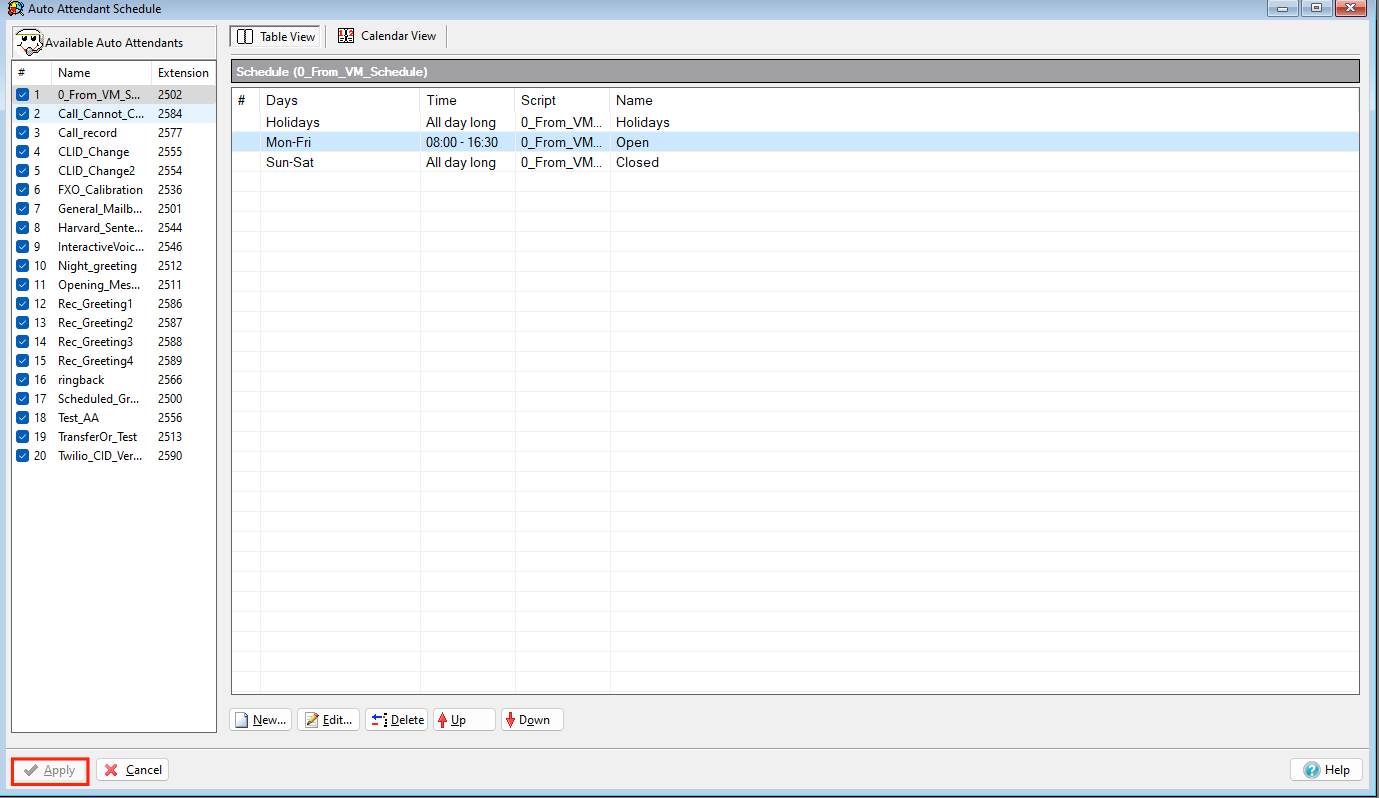
Schedule
Schedules can be modified to include specific closed hour ranges, days or other dates that you would like to have a different call flow / message using the Auto Attendants above.
Typically auto attendants will be within the 2500 range and will usually contain an option for holidays, open, and closed schedules.
Navigate to Auto Attendant -> Schedule

Modify
To modify a selected schedule, please see the following steps
- Select a schedule
- Double click on a row that you would like to modify the time or script
- Once finished changing settings, click OK
- On the main schedule dialogue, click Apply